
To me that sounds like it's the way to go if you don't want to paint it.
I've had a lot of time to just think about interior design, and I've decided to put beadboard on all the walls in the second bedroom upstairs without taking off all the original baseboard/cap/shoe. It's available in 1/8" thickness and that should just work, considering I want to paint it all anyway. I may have to add a strip of something where the sloped ceiling meets the kneewalls, but maybe I can get away with just caulking that seam.
Also I know that I will break some hearts with this information, but I've decided to paint the original knotty pine paneling in the solarium, which will become my goldsmithing studio. I'll leave the window trim and the little closet alcove unpainted. It's just so dreary right now, even with all the windows.
What I did at my house today...
-
GinaC
- Forgotten more than most know
- Posts: 437
- Joined: Sat Jan 26, 2019 8:19 pm
- Location: Newport, VT
Re: What I did at my house today...
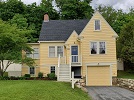
1939 Minimal Traditional
-
phil
- Has many leather bound books
- Posts: 4616
- Joined: Tue Aug 18, 2015 6:11 pm
- Location: Near Vancouver BC
Re: What I did at my house today...
Manalto wrote:Phil, are you trying to mimic the look of beadboard wainscot? What about v groove boards? It would look good at 3 1/2 in and would be relatively easy to do on the table saw if you beveled the edge leaving an eighth of an inch or so to butt together. Another thought - if you have a lot of wood how about a high wainscot with a plate shelf at the top? You usually find them in dining rooms but it could be nice in the living room too. Just a couple of ideas - please don't think I'm talking down to you or treating you "differently."
I never sensed any negativity in any of your comments ever James. The thing with what I picture as "grooved bead" board is that it would be the same grain pattern throughout, rather than each piece having it's own grain.
I can try to find a sample of some old wainscot to copy the profile. I do plan for it to be as high as eye level. I could see when I took the walls apart , they had a scratch coat of plaster to that height. then they had finished plaster above that so I think there was wainscot originally. sometime in the 50's I guess they thought it unfashionable and removed the wainscot, probably around the same time they dropped the ceiling in the kitchen by a foot. they had feathered in new drywall over the scratch coat. I stripped it to bare studs and put soundproof drywall, finished it to the floor for now. That level seems to work with the window frames, dissecting them at a height that seems proportional.
The cost of getting nice knot free edge grain fir might be fairly prohibitive so I was thinking of just taking a 2x4. running it over my jointer, then milling the profile of the wainscott into the surface. then taking a thin slice and continuing with the same process until I run out of material. I could cut them 3/4, 1/2 or even 3/8 but there is some waste due to the saw blade with ( kerf) the thinner they are the more I get from a 2x4. I might make them about 1/4" or even thinner and get away with it.
I thought maybe if I didn't worry about the T and G and just cut them so on the surface they appeared the same then I might arrange them on some thin MDF and glue them up as a sheet that I can apply. it should end up looking the same , then I'd use a wainscot cap or chair rail on the top edge. the bottom would be sitting on the baseboard. I might have to just try it and see how it looks. I dont see any reason why it would look different than if I bought wainscot in fir but I think it was 2 bucks a lineal foot or something , it would add up. I could get wood from a small mill and use that. my brother has a friend that just bought a little bandsaw mill. At one time I found a pile of 2x4 that was old. the pile must be 50 years old. about half of them have a channel cut down the middle, its a deep groove. I'm not sure what the guy was making with them. I figured that stack could be a source for a lot of it. there isn't enough to do them the proper dimension. Ideally it would all be fine grain old growth cut with the edge grain towards the face.
first Il put the trim all back. I took one of the longer ones,, it must be 25 feet long. I cut a slice out where the electrical outlet was and glued the board together with a mitered butt joint. That worked, It looks nice and flat and straight still. last night I glued a couple of 6' strips on the backside. Ill continue until I get to the end of the board.
with those strips on there I could possibly run the whole plank through my thickness planer , or I could use a belt sander. that will just flatten it out and remove any old paint chips and the darkened layer. remove 1/16 or 1/8th maybe. If they are cupped when I plane them it will make them flat but a bit thinner, that isn't noticeable because I built them up with the strips.
Once Im happy with the face of the plank I will run the edges over my jointer, then re-cut the roundover with a router, then sand by hand and finish , then apply. If I want it darker Ill put some stain in my oil on the second or third coat.
some heavy sanding or planing removes all the embedded dirt and paint chips and marks and dents and things. this is less laborious than trying to nit pick at every bit of embedded paint. you could say it removes the patina but I'm ok if my baseboards dont have patina. I can control the darkness. Id rather just sand through the dirt and roughness and paint chips than go crazy nit picking at them individually.
It's possible to remove a layer of paint by simply planing through it but then you need to replace the blades pretty often. I like to heat gun most of it off and check for nails.
I find that once I break this outer shell and get into the inner board itself , then I can use a hand scraper effectively to true it up. If you try to hand scrape that hardened coating you just get tired hands. a hand plane will work somewhat, an electric powered planer is faster.
other than wainscott , it could be panels instead. I thought of making panels using plywood with fir veneer then using solid fir for the edges of the panels. traditionally the panels would be grooved much like cupboard doors are but it is possible to achieve the same look by simply placing them so they appear as panels. since I have drywall behind I can attach to that so there isn't any need for the panel to be structural, its basically just applique. Its hard to find plywood with a fir veneer that is edge grain but I think veneer like that is available so it can be applied to thin plywood.
Re: What I did at my house today...
Finally finished painting the Workshop/Playhouse/Summer kitchen (I can't decide what to call it; open to suggestions...)

-
awomanwithahammer

- Knows where blueprints are hidden
- Posts: 911
- Joined: Fri Jan 22, 2016 1:19 am
- Location: Maryville, TN
-
Gothichome
- Moderator

- Posts: 4192
- Joined: Sun Aug 16, 2015 8:34 pm
- Location: Chatham Ont
Re: What I did at my house today...
Working on windows, always windows. Got a start on the front door restoration as well.
-
phil
- Has many leather bound books
- Posts: 4616
- Joined: Tue Aug 18, 2015 6:11 pm
- Location: Near Vancouver BC
Re: What I did at my house today...
had a week off . started in on my roof. I made a little cricket out of wire and duct tape just to get the shape dimensions and angles , I should be able to make a little plywood box to cover with roofing.
started stripping the area over my kitchen. got about half way but had to tarp over. Had some issues with that because of the walking boards. they created a little pool and a small hole in the tarp let it go over my kitchen so the tarp was effectively catching most of the water , so even a light rain caused more dripping than imaginable. The drama caused was a bit much , but anyway..
I got down to where the slope changes, and then it went from plywood into shiplap. the shiplap is a little punky in spots. I opted not to go tearing into all that and just sheet over it. trying to carry plywood onto the roof myself was awkward. at first I climbed the ladder with a sheet in my hands, but had issues trying to get it on the roof , so awkward. I got in a position where I was holding the sheet behind me wondering if I should drop it or what.. I got it down and next time I pushed the sheet up ahead of me on end and that was easy. ergonomics 101 I guess.
I tore off most of the roofing, adding the membrane behind me as I worked down but had to stop with that to put plywood down. I wasn't sure how to hide the step where the plywood begins. I took a electric plane and thinned 6 inches from the edge so it can give a little. I can probably just add a little 1/4 inch ply to hide the step and smooth out the transition.
one of the fascia boards had rotted away. it was a weird shape tapering from nothing to about 6 inches. its right above the existing roof. The other fascia boards are quite wide.. that one can't be wide because the other original portion of the roof is in the way.
I managed to cut the taper out of a cedar 2x6 and took the piece I cut off and added it to the other end so that made a board tapered from nothing to about 10 inches or so. I put a strip of 1x2 fir along the edge so the plywood can attach to that and I will put a drip flashing over the top edge , covering the strip.
a tapered fascia board seems a bit weird but I guess it will do ok. the edge near the gutter is now more similar to the ends of all the other fascia boards. Now I have something a bit more solid to attach the 1x6 the gutter is attached to. it was all wiggly and lose because of rotted rafter tails especially near the corner.
I got another rainstorm so the tarp went back on with the walking boards moved. I'm hoping it doesn't get windy. In a week I can continue. once I get the plywood all on and the membrane it shouldn't be leaking like a sieve anyway. I'll leave the shiplap alone its not so bad. I just didn't want issues when I put the roofing on , the nails need something consistent to grab and I envisioned hitting a row where all the nails fell on a crack where the shiplap joined or a weak area. No one will be able to see the plywood.
The back of the house originally had the typical roof brackets and the fascia board. when they lifted the roof they left all that in place and put a second fascia board that meets the first one, but they didn't move the roof brackets. they reduced the slope of the roof over the kitchen. It looks like an addition, but maybe its part of the history. I'm not sure if I should even attempt to hide the fact it was added onto. maybe I'll just call it character
my fascia boards are all original , they still have slots cut in them from a board that used to run under the old wooden gutters to support them , maybe one day I could put a board there and sort of box in the gutters to hide them. I guess it shows how well that old lumber lasted, to have endured Vancouver rain for 96 years and still be mostly intact.
-
Lily left the valley

- Inventor of Knob and Tube
- Posts: 2170
- Joined: Sun Aug 14, 2016 2:07 pm
- Location: Gardner, MA, USA
- Contact:
Re: What I did at my house today...
...was I stayed out of the way while the plumbers replaced some of the last remaining original brass plumbing left here.
Long story short, we had to replace our kitchen faucet. Last Friday, I installed the one we bought and what used to be a slow occasional drip on the hot water side (inside the back wall cavity of our farmhouse sink) became a stream. The stress of the swap did it in. Our boilerman confirmed this which is the main reason I was doing it on the fly because he was there for our yearly cleaning.
Given a lot of factors, we called in the pros. Thankfully, they fit us in today and we had been setting aside some "oh noes!" funds, so I have no regrets--especially since now I can catch up on laundry and dishes and plan to take a loooong shower later. (I know the plumber doesn't either because he's very happy we paid in full today.)
We also finally have cutoffs under the sink! Before, the only way to cut off either was the main and a recently added cut off right off the boiler that was installed when we got our new hot water coil this past spring.
Our new faucet, complete with spiffy soap dish that we're using for the sponge:

Long story short, we had to replace our kitchen faucet. Last Friday, I installed the one we bought and what used to be a slow occasional drip on the hot water side (inside the back wall cavity of our farmhouse sink) became a stream. The stress of the swap did it in. Our boilerman confirmed this which is the main reason I was doing it on the fly because he was there for our yearly cleaning.
Given a lot of factors, we called in the pros. Thankfully, they fit us in today and we had been setting aside some "oh noes!" funds, so I have no regrets--especially since now I can catch up on laundry and dishes and plan to take a loooong shower later.
(I know the plumber doesn't either because he's very happy we paid in full today.) We also finally have cutoffs under the sink! Before, the only way to cut off either was the main and a recently added cut off right off the boiler that was installed when we got our new hot water coil this past spring.
Our new faucet, complete with spiffy soap dish that we're using for the sponge:
--Proud member of the Industrious Cheapskate Club
--Currently pondering ways to encourage thoughtful restovation and discourage mindless renovation.
--Currently pondering ways to encourage thoughtful restovation and discourage mindless renovation.
-
GinaC
- Forgotten more than most know
- Posts: 437
- Joined: Sat Jan 26, 2019 8:19 pm
- Location: Newport, VT
Re: What I did at my house today...
Yesterday evening my custom wood plantation shutters for my upstairs rooms were delivered, so today I went to put them up. Unfortunately they didn't tell me that I'd need a countersink set in order to drill my own installation holes, so that's going to have to wait. I plan to just put in two screws in each one for the time being so they can come down easily when I go to restore the sashes. Blackout curtains do not work well and I really needed something solid to block the heat from the sun up there, and I'm tired of suffering.
One window is wonky -- I'm surprised only one -- so I'm going to have to carve out a little niche on the back side of the shutter because I have adjustable wood windows with the little screws on the sides and those stick out a bit. Or I may just leave it leaning there without screwing it in to see exactly how much paint comes off when I restore the sash. It just might squeeze by.
Oh, the difference in room temperature is already apparent, even with the shutters just leaning in the window frames!
(Thanks again, James, for the link to Steve's Blinds! I got their wood "Steves brand" and they are very nice quality. The painted finish is warrantied against fading for 5 years, which is not really an issue for me because I ordered an off-white. I did order color samples beforehand in order to match the paint I'm going to use for the trim.)
1939 Minimal Traditional
-
Gothichome
- Moderator
- Posts: 4192
- Joined: Sun Aug 16, 2015 8:34 pm
- Location: Chatham Ont
Re: What I did at my house today...
Lily, these thing come up unfortunately, the new faucet looks nice, even has a nice period look for a modern fixture. Emergency funds are a must when owning an old home.
Gina, interior shutters are a great thing to have, did you get ones with movable slats. Gothic home has interior shutters on all the windows. Ours are stained, over 140 years they have held up well although the back side (facing the sun has dried out) nothing a good dose of linseed oil fixed that.
Gina, interior shutters are a great thing to have, did you get ones with movable slats. Gothic home has interior shutters on all the windows. Ours are stained, over 140 years they have held up well although the back side (facing the sun has dried out) nothing a good dose of linseed oil fixed that.
-
GinaC
- Forgotten more than most know
- Posts: 437
- Joined: Sat Jan 26, 2019 8:19 pm
- Location: Newport, VT
Re: What I did at my house today...
140 year old shutters! I'm so jealous! And it's great news that they've held up all this time. Yes, I got the traditional model with two panels for each window with a control bar down the center of each panel. Since my windows are in pairs, I got folding panels. It looks like your windows are also in pairs, do yours fold or do you have 4 opening "doors" for every pair of windows? I'm also guessing your slats are narrower, mine are 2 1/2" since I figured that was a good medium size. I just ordered some small hexagonal glass knobs for them from Kilian to make them easier to open since they have magnetic closures.
1939 Minimal Traditional